Full 3D Alphabet for Decoration
There is a distinct satisfaction in seeing a flat digital file transform into a tangible, dimensional object. Whether you are hanging a personalized sign above a nursery bed or adding a rustic touch to a wedding reception, the bridge between imagination and reality often lies in the quality of your design assets. The Full 3D Alphabet for Decoration is precisely that bridge—a comprehensive digital toolkit designed to help creators produce stunning, layered typography that pops off the page and onto the wall.
This isn't just another basic font download. It is a meticulously crafted collection built with Adobe Illustrator, ensuring that every curve and corner is optimized for precision cutting. For those who spend hours tweaking settings on their machines only to end up with jagged edges or misaligned layers, this product offers a sense of relief. It has been tested rigorously to ensure compatibility across various platforms, making it a reliable staple in any crafter’s library.
Why Layered Typography Changes Everything
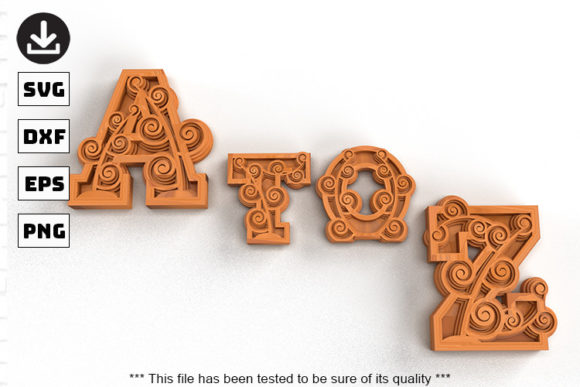
Standard single-layer cutouts have their place, but they lack depth. When you use a multi-layer design like the Full 3D Alphabet, you are essentially creating a shadow effect or a stepped relief without needing complex software skills. Each letter consists of four distinct layers. By cutting these out separately—perhaps in different colors, materials, or textures—and stacking them, you create a visual impact that feels professional and high-end.
Imagine a wooden "Welcome" sign where the base layer is dark walnut, the middle layers are medium oak, and the top layer is white painted wood. The contrast creates a modern, architectural look that simple vinyl decals simply cannot replicate. This technique allows you to take something as simple as a greeting and elevate it into a piece of decor.
Real-World Applications Across Different Projects
The versatility of this digital asset means it can be applied to a wide array of scenarios. Here is how different users might integrate this alphabet into their workflows:
- Home Decor Enthusiasts: Creating custom wall art for living rooms or bedrooms is perhaps the most common use case. You can spell out family names, motivational quotes, or room titles. Because the design fits within a 30cm x 30cm page, it is perfectly sized for standard framing or direct mounting on walls.
- Event Planners and Wedding DIYers: Personalized signage is huge in the wedding industry. Think of table numbers, seating charts, or aisle markers. Using heavy chipboard or balsa wood, you can create durable, reusable signs that add a cohesive theme to the event. The layered effect adds a touch of elegance that guests will appreciate.
- Small Business Owners: If you run a boutique bakery or a handmade jewelry shop, branded signage matters. A 3D alphabet allows you to create eye-catching displays for pop-up markets or permanent store fixtures. The ability to switch materials—from cardboard for temporary events to metal for permanent branding—makes this a cost-effective investment.
- Educators and Parents: Early childhood education relies heavily on visual aids. A colorful, 3D alphabet displayed in a classroom or home learning space helps children associate letters with physical objects. It turns abstract concepts into concrete, tactile experiences.
Material Versatility: Beyond Just Wood
One of the strongest selling points of this product is its material agnosticism. While wood is the obvious choice for a "3D" look due to its thickness and grain, the design files support a much broader range of mediums.
Paper and Cardboard: For quick prototypes or lightweight decorations, thick cardstock or corrugated cardboard works beautifully. This is ideal for party decorations that need to be assembled quickly and disposed of afterward. The clean lines of the SVG and EPS files ensure that even intricate details cut cleanly from paper without tearing.
Metal and Plywood: If you have access to a laser cutter or a CNC router, you can push the boundaries further. Cutting thin sheets of plywood or even soft metals opens up industrial-chic possibilities. The DXF format ensures that vector paths remain accurate regardless of the material density, preventing tool path errors that could ruin expensive stock.
Balsa Wood: For those using Cricut or Silhouette machines, balsa wood is a game-changer. It is lightweight, easy to cut, and holds paint well. As noted by experienced users, doubling the layers of 2mm balsa wood can mimic the substantial feel of heavier woods while remaining manageable for smaller cutting mats.
Navigating File Formats and Compatibility
Before diving into the cutting process, it is crucial to understand what you are receiving. You will not receive a physical product; instead, you will download a zip file containing the designs in multiple formats: SVG, EPS, DXF, PNG (Transparent), and PDF. This variety is intentional, catering to different software preferences and machine capabilities.
If you primarily use Silhouette Studio, the SVG and DXF files will likely be your go-to. For those working with Adobe Creative Cloud, the EPS and AI-compatible structures provide the highest fidelity. The inclusion of transparent PNGs is particularly helpful for previewing designs or creating mockups before committing to physical production.
A quick tip on unzipping: Sometimes, operating systems can make extracting files tricky. Remember to right-click the folder and select "Extract All" to ensure all layers are separated correctly. Dragging individual files can sometimes lead to confusion if the layer order isn't preserved in your design software.
Practical Considerations for Best Results
While the design is robust, achieving a perfect finish requires a bit of know-how, especially depending on your equipment.
Cutting Thick Materials with Handheld Machines: If you don’t own a laser cutter, you can still achieve impressive results with a Cricut. However, patience is key. Doubling up layers of heavy chipboard or balsa wood (2mm) is a recommended technique to get that substantial 3D look. Be aware that cutting through multiple layers increases friction on the blade. You may need to adjust the pressure setting or run the cut twice to ensure clean separation.
The Weld Button: A common pitfall when cutting layered letters is dealing with internal spaces. In some software, small gaps between layers can cause alignment issues. Using the "Weld" function before sending the job to the machine can merge overlapping shapes, ensuring that the layers stay aligned during the cutting process. This is a small step that prevents major headaches later.
Layer Alignment: Since each letter has four layers, keeping them perfectly stacked during assembly is vital. Using a lightbox or simply holding the pieces up to a window can help align the layers before gluing. Consistency in spacing between layers also contributes to the overall aesthetic, so measuring once and cutting twice remains the golden rule.
Who Is This For?
This product is ideal for anyone who values efficiency and quality. It saves hours of tracing or modifying fonts found online, which often come with licensing restrictions or poor vector quality. Whether you are a seasoned pro looking to streamline your workflow or a beginner eager to start your first 3D project, the Full 3D Alphabet for Decoration provides a solid foundation. It removes the guesswork from the technical side, allowing you to focus on the creative aspect of choosing colors, materials, and placement.
In a market saturated with generic clipart, having access to professionally tested, multi-format design assets gives you a competitive edge. It transforms simple letters into statement pieces, proving that with the right tools, even the simplest ideas can become extraordinary decorations.